
An Introduction
This blog isn’t intended to be a full historical run-down and/or in-depth detailing of Japanese saws (Nokogiri [鋸]). Although, I have endeavoured to make it more than just a brief overview (as I’ve seen in other blogs and online articles) and have gone so far as to answer some of the questions I had before I dared to make the foray into the world of Japanese Saws. Questions such as; How do they differ from Western-type saws, what advantages are there to the different types and why do so many crafters and makers on (and off) social medial use them? (Or do they..?).
Disclaimer
Before we get into the intricacies of the subject that is Japanese Saws (and for full disclosure), I just want to make something clear. Although this blog may look like one big advertisement for the Zetsaw (Z-Saw) brand of Japanese Saws, it really isn’t. I am IN NO WAY sponsored by them, or Okada Hardware Mfg. Co. Ltd. who manufacture these saws. Nor has anyone contacted me to produce this article for them, and no monies have been received for this blog’s creation.
I’m doing this because I have these saws as part of my arsenal of tools and use them in my crafting. Plus, I like them. I use them here for the descriptive and illustrative purposes of this blog. There are, of course, other manufacturers of Japanese Saws out there and they all produce comparable products. Right, with that all out of the way, let’s get into it.
[Edit: 27/01/2026] The above disclaimer was written before I’d even thought about a webstore, never mind actually selling the Zetsaw range of Japanese Saws. So, just to update the “full disclosure” statement, I now import these saws directly from Japan, and sell them on my website; Silverhand Store. I still have not received any incentive to be positive about their products, for this or any future blogs. I sell them, because I use them and have (so far) enjoyed using them when making my creations.
How Do Japanese Saws Differ From Western-type Saws?
The overriding difference between Western-type saws and Japanese Saws is the way that they cut whatever it is (presumably, but not necessarily, the wood) you’re cutting. Whilst Western-type saws typically cut on the push-stroke, Japanese Saws have a tooth configuration that cuts on the pull-stroke. By the way, Japan is not the only country that uses saws which cut on the pull-stroke. Other countries, such as Korea and China, also use these types of saws, it’s just that Japan appears to be more widely known, historically, for their development and use. It’s thought that the pull-stroke action evolved due to the Japanese preference for sitting or squatting whilst woodworking. When seated, you’re able to pull a saw with more force and control than you would by pushing a saw away from you.
On the pull-stroke, the blade is put in tension, thus the likelihood of the blade bending or snapping, whilst cutting into the wood, is greatly reduced. I’m sure we’ve all done it, whilst using a Western-type saw, trying to cut a piece of wood like you saw (no pun intended) a parent do, when you were younger. You’ve finished the small starting cuts and are just getting into the long cutting strokes, Then a tooth catches near the leading edge of the saw. The blade flexes, uncontrollably ‘pings’ out of the cut, the hand holding the saw flails wildly away from you, almost taking out an eye of the kid watching you from the neighbour’s yard (or is that just me?).
That’s not to say a similar thing can’t happen with Japanese saws. It can. I’ve done it on more than one occasion. You just have to remember to make a lighter push-stroke, through the cut, and be heavier on the pull-stroke to reduce the risk of blade flexing occurring.
Which brings us to the other main difference between Japanese Saws and Western-type saws. Japanese Saw blades are typically thinner, thus providing a smaller kerf (kerf being defined as; the width of material removed by the cutting/sawing action). A thinner blade means that the set of the saw’s teeth isn’t as wide, which makes for cleaner, more accurate cuts, whilst producing less sawdust. Naturally, the more set the blade’s teeth have, the wider the kerf and the rougher the cut they produce. The ideal smooth surface is produced by teeth with no set, of course, but most work requires that saw teeth have some degree of set to them. Softwood and wet/green wood requires teeth with more set than hardwood and dry wood.
Types of Japanese Saw
As with Western-type saws, there are numerous types of Japanese saws. But they generally fall into two broad styles; Kataba [片刃] single-edge blades and Ryoba [両刃] double-edge blades. The Kanji for both Kataba and Ryoba literally mean single- and double-edge, respectively. With that being said, Japanese Saws come in many shapes, sizes, with a multitude of uses (some of which are specialised).
So, what follows is by no means a complete list of every type of Japanese Saw in existence, but more a look at the more popular types used in Western woodworking.
Ryoba-noko
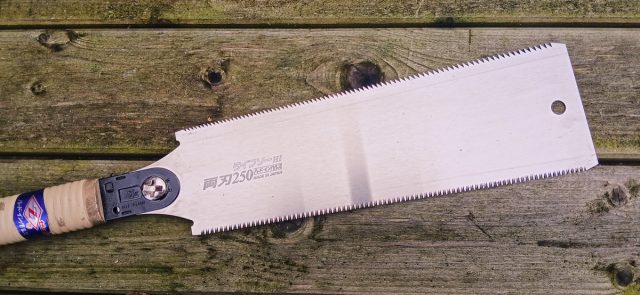
These are probably the most recognised of the Ryoba-style Japanese Saw and are often just referred to as Ryoba. These saws are typically just for general, deep, rough cutting and dimensioning work. One edge of the blade has coarse teeth and is used for rip cuts, whilst the other edge has finer teeth used for cross cuts. I have seen various social media types using Ryoba-noko for larger dovetail and joint work. Usually, this is where the depth of the cuts required go beyond the range of what can be achieved with Dozuki-nokogiri <see below>, which are typically used for this kind of joint work. However, the joint would then need some clean-up with a chisel. #CorrectToolForTheJob
Anahiki-nokogiri
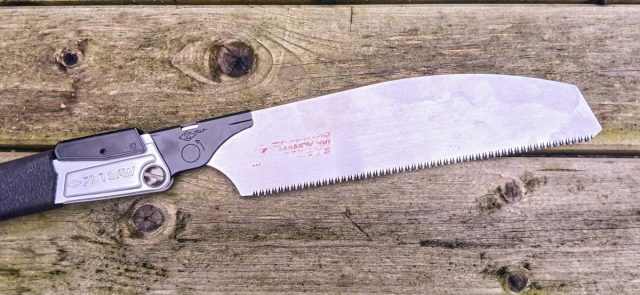
Anahiki-nokogiri can be either Ryoba- or Kataba-style, but are predominantly the latter. In fact, if you look on most of the websites selling Japanese Saws (this side of the world, that is), they will most likely be referred to as just; Kataba. These saws may also be called by other names, like; Hana-maru (round nose), Hana-magari (bent nose), and Saba (Mackerel – Sounds fishy, but true. More likely Sabā: Sabre Saw). Traditionally, Anahiki-nokogiri are crosscut saws, used for cutting logs, beams and other rough dimensioning work. But, some of the Japanese Saw brands out there (especially those that have an interchangeable blade system) do supply blades with teeth configurations for rip cuts and/or working with hardwoods.
You also may see blades with a convex cutting edge. These blades are ideal for making rebate (rabbet, for readers in the U.S.) cuts, through dados and sliding dovetail cuts across the wood grain. This curved edge reduces friction on shallower cuts, as fewer teeth are in contact with the wood (as opposed to making the same cut with a blade with a straight cutting edge). The convex blade also provides some removal of sawdust from the cut.
Dozuki-nokogiri
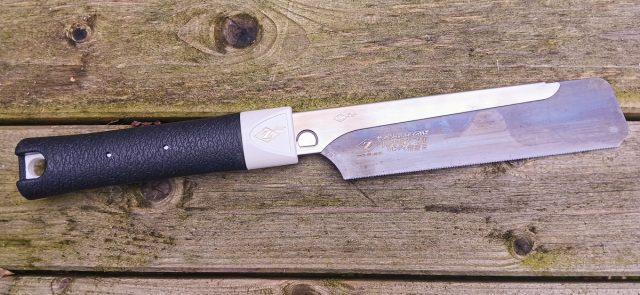
Dozuki-nokogiri [胴付鋸] is another Kataba-style saw that is more typically referred to as just Dozuki in the Western hemisphere. These saws more closely resemble traditional Western Tenon back saws, where a stiffening spine (the Kanji for Dozuki-nokogiri translates to; saw with a spine) is placed over the back of the blade for rigidity. Both the Japanese and Western-type saws are used for pretty much the same purpose; finer joint work (dovetails, tenons, etc).
I have a Zetsaw Handy150 Fine Craft which has a blade for cutting plastics, soft metals and, erm, bone (I don’t use it for the latter, honest). I mainly use it for cutting aluminium (aluminum, again, for readers in the U.S.) equal angle trim, which I use in my Cab Conversions projects. I also have a bamboo specific blade, for those little gardening jobs, for which I just switch out whenever the need arises.
Kugihiki-nokogiri
Kugihiki translates to “to cut nails” (where the word “nails” refers to dowels made of wood or bamboo) and is used to flush-trim these “nails” level with the surface of work. They can be either Kataba or Ryoba-style. The teeth of Kughiki-nokogiri have no set, leaving a smooth finish to the cuts and greatly reduces scratching of the work’s surface. Having no set also means that the saw can be flipped over and the other side of the blade used, for ease of use, and have no fear of scratching.
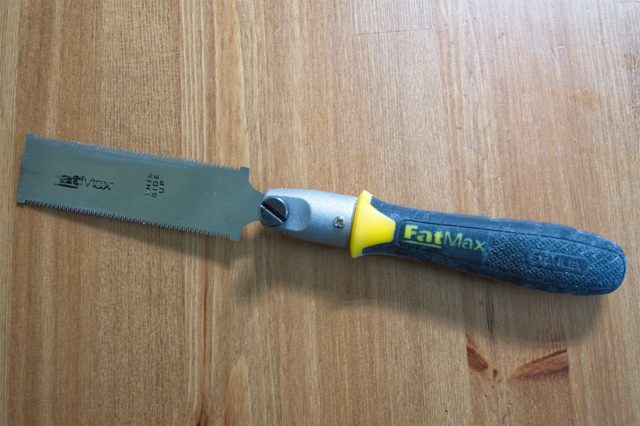
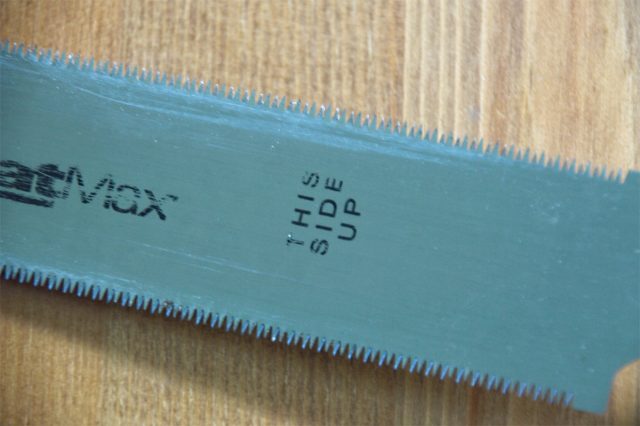
As an aside, my partner Gillette had previously bought a Stanley® FatMax® flush-trim saw for her crafting work. This has a Ryoba-style blade, but the blades obviously (and bizarrely) have set to the teeth on one face of the blade, as the blade clearly states; This Side Up. Which completely negates the ability to flip over the blade. Thus, whether you’re left- or right-handed, using this Stanley® saw means that (should one edge of the blade get buggered up and/or is unusable) you have to use the opposite edge in a cack-handed (Google it) way, so as not to scratch your work’s surface!
A glaring oversight, or simply a cunning marketing ploy by the tool giant to force you into buying more blades? You decide.
Pro Tip: (not that I consider myself being “pro” at anything, I’m more “adequate”. But, “Adequate Tip” just doesn’t have the same ring to it): What I do (wherever possible and/or practicable), when flush-trimming dowels, is try to make the cuts with (along) the grain of the wood surface I’m cutting flush to. Then, should a scratch occur, it can be more easily be sanded out, as opposed to making flush cuts against (across) the grain.
Mawashibiki-nokogiri
The Mawashibiki-nokogiri are very much akin to the Western-type Keyhole/Drywall saws. They have a tapering blade (heel to toe), and are used for making small radius curves or holes. Traditionally, Mawashibiki-nokogiri are also tapered from the cutting edge of the blade, to the top edge. The thinner top edge reduces friction and provides clearance, when making curved cuts. There are different types of these saws, and the style is dependant upon the trade/profession and the intended use.
Azebiki-nokogiri
These small, odd-looking Japanese Saws are rarely seen online. But, when they are, they’re usually in the Ryoba-style (but can also be Kataba-style). Like the Ryoba-noko, one edge has teeth configured for rip cuts and the other for cross cuts (so, if you had Kataba-style, then you’d need two saws; one for rip cuts and a separate one for cross cuts). But, unlike the Ryoba-noko, both cutting edges are convex. The main use for Azebiki-nokogiri is for making pocket cuts in the middle of a board or in sheet material. The nearest Western equivalent (that I can think of) would be the top “nose” edge of a floorboard saw.
As with the aforementioned convex blades for Anahiki-nokogiri, Azebiki-nokogiri can also be used for making rebate (rabbet), dado and sliding dovetail cuts, and provides sawdust removal whilst performing the cuts. The advantage of Azebiki-nokogiri is that, the shorter blade gives more control and is better suited for “blind” versions of the above cut, either across or with the wood grain. The Kataba-style blades may also be used to cut large radius curves, should they be required.
Why do so many crafters and makers use Japanese Saws?
If I’m being brutally honest (and I usually am), I would suggest that answer is a simple one. For the majority of the “popular” crafters and makers that post regularly on social media, it’s most probably just because they think it looks cool. Wafting around a huge Ryoba-noko in front of the camera (apparently) adds an air of “sophistication” to the casual and/or uninitiated viewer. You only have to look at these content providers’ back catalogue and see how many times they actually use Japanese Saws in their everyday woodworking, to see if they’re genuine users or not. More often than not, they’re using table saws, track saws, mitre saws, or one of a myriad of other saw machinery, and/or routers to make the same cuts.
Genuine, Japanese Saw users either don’t use social media, or if they do, they don’t post as regularly, and/or have more of a niche following. It takes time to craft items with traditional hand tools (not just of the Japanese variety), which doesn’t readily conform to the “content, Content, CONTENT!” ethos of the social media giants (I know full well the effects of “burn out”).
I use Japanese Saws for specific tasks, during my craft working process. I could use more contemporary machinery to perform the same tasks, especially for bulk, repetitive cut. But, sometimes it’s quicker for me to pick up a saw and a jig, to perform the task, than to spend five minutes setting up a machine. Especially if I’m making one-off cuts or a small, limited number of cuts. That’s not to say that I don’t use contemporary woodworking tools and machinery, because I do. I’m just not the sort of craftsperson that has Japanese Saws and rarely (or, in some cases, never) uses them.
Further Reading And Footnotes
For a more detailed look at the many types of Japanese Saws (and, indeed, other Japanese woodworking tools), I suggest trying to get your mitts on a copy of Japanese Woodworking Tools: Their Tradition, Spirit and Use, by Toshio Ōdate.
For more information About Me and all that is Silverhand Creative, go check out the the relevant section on this website. I have a presence on Instagram and Facebook, where I post photos (and the odd video) of ongoing and finished projects. There’s also a YouTube channel, where you can see how I go about doing what I do and what tools I prefer to use. So, feel free (there’s no pressure) to follow and/or subscribe to any (or all) of the above.
I am most definitely amenable to commission work and have a web form for you to get in touch, should you be looking for something a little more custom.
All trademarks (registered or otherwise) used in this blog lie solely with their respective owners.