
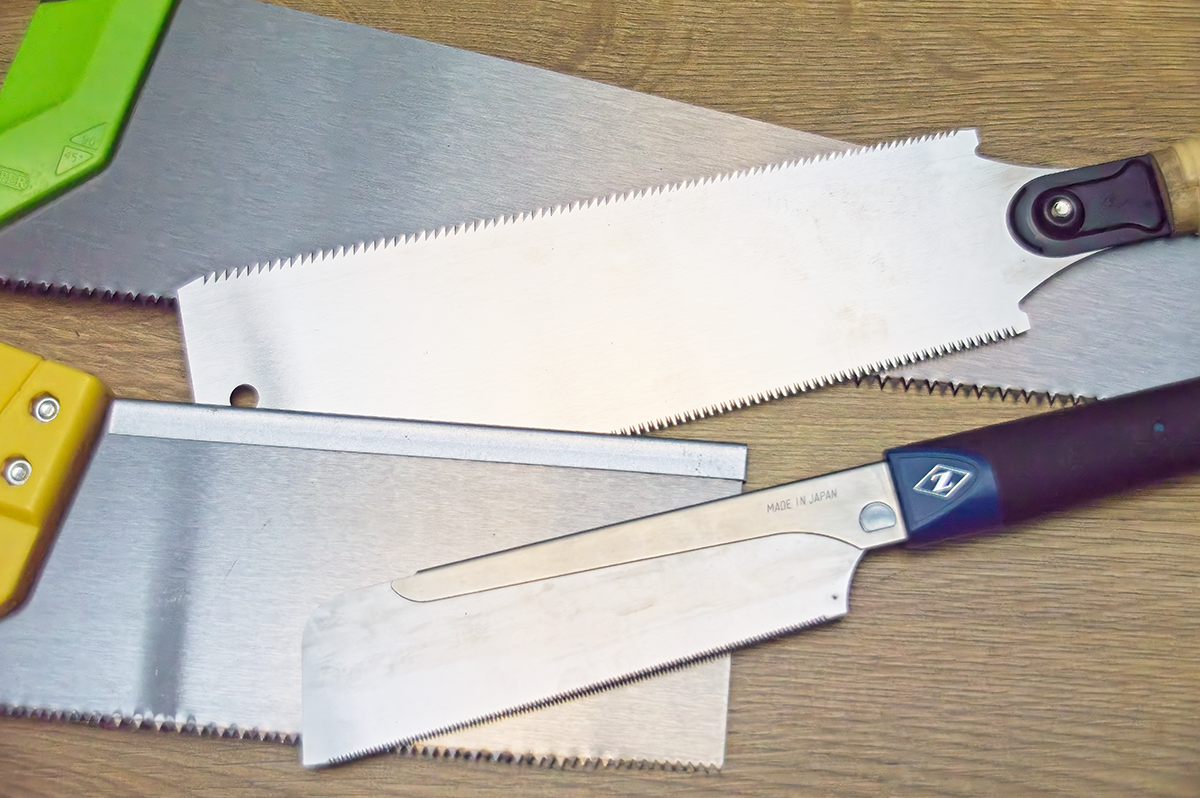
Why Japanese Saws..?
This is a question I get asked a lot, and I mean a lot. That and; “why do you use Japanese saws in your crafting?”. To fully answer either of these questions there needs to be an understanding of the fundamental comparative differences between Japanese Saws vs. Western Saws.
So, in this article I’ll be providing an honest (and most of all) unbiased comparison between the two. This is by no means a “which one is better”-type article, it’s more of an opportunity to provide pertinent information. That way, you can make up your own mind about which of these saw types is best fit for you, your way of working and your projects. Whether that be crafting, DIY, body disposal (JOKE..!), or otherwise.
Pushmi-Pullyu* (Push Me, Pull You)
The most singular difference, when comparing Japanese Saws vs. Western Saws, is in the direction that the cutting action occurs. For Japanese saws, the cut is made on the pull-stroke, whereas the majority (if not all) of Western saws make the cut on the push-stroke.
So, why the difference? Well, as I’ve previously mentioned in another blog, it’s thought that the pull-stroke action evolved due to the Japanese (along with other Eastern cultures’) preference for sitting or squatting whilst woodworking. When seated, you’re able to pull a saw with more force and control than you would by pushing a saw away from you.
Whereas, in the Western hemisphere, woodworkers typically stand over their workpiece and push the saw down through the cut. The gravitational assist provides a small force increase, and also pushes the workpiece against the workbench to provide resistance and aid in the cutting process.
*It’s a Doctor Dolittle reference.
Blade Differences
This aforementioned difference in sawing action between Japanese Saws vs. Western Saws has determined the divergent evolutionary path taken by manufactures of both saw types, globally. Whilst both types have visible commonalities, factors such as blade thickness, tooth set and kerf have subtle differences.
Thickness
Conventional Western, general-purpose hand saws typically have a blade thickness somewhere between 0.75mm and 1.03mm (approximately 1/32” and 3/64”). The thicker the blade, the less flex of said blade is encountered during the sawing action. Tenon saw (back saw) blade thickness is usually at the bottom end of this scale, as the spine stiffens the blade to reduce this flex. I say reduce, as anyone who has caught the leading tooth during a cut will agree, it is never completely eliminated.
A comparable universal cut Japanese saw has a typical blade thickness of around 0.50mm to 0.70mm (approximately 1/64” and 1/32”). A Dozuki (Japanese tenon saw equivalent) has a typical blade thickness around the 0.30mm (less than 1/64”). This reduction in blade thickness (as compared to the Western equivalent) is only made possible due to the pull-cut action of these saws. As the blade is pulled through the cut, it is put into tension. Thus any flex whilst making a cut is pretty much eliminated.
There is, however, a caveat. Just because blade flex in Japanese saws is all but eliminated during the pull-cutting action, does not mean it is eliminated altogether. Once you’ve pulled the blade through the cut, you then have to push the blade back through the cut to make consecutive cuts. It’s at this point where you can still catch a tooth and flex the blade. As the blades are considerably thinner, they are more liable to snap.
So, remember; when using Japanese saws you make a heavy pull-stroke to make the cut, then use a lighter push-stroke back though the kerf of the cut to make the next one. If you’ve never used a Japanese saw, then this will take a period of adjustment.
Kerf & Set
Speaking of kerf, this (along with “set”, which I’ve described below) is another factor that differs between Japanese Saws vs. Western Saws. Kerf is defined as; the width of material removed by the cutting/sawing action. This width is typically double the “set”, plus the blade thickness.
The “set” of a saw blade is how much a tooth is bent away from the planar axis of the blade. Alternate teeth, along the length of the blade, are bent in opposing directions to give clearance within the cut for the blade itself. Thus, reducing friction and binding when physically making a cut. A general rule of thumb for “set”, is that the amount the tooth is bent is typically never more than half the thickness of the blade. The more “set”, the wider the kerf, the rougher the cut, and the more effort is made to make that cut, as more material is being removed during the sawing action.
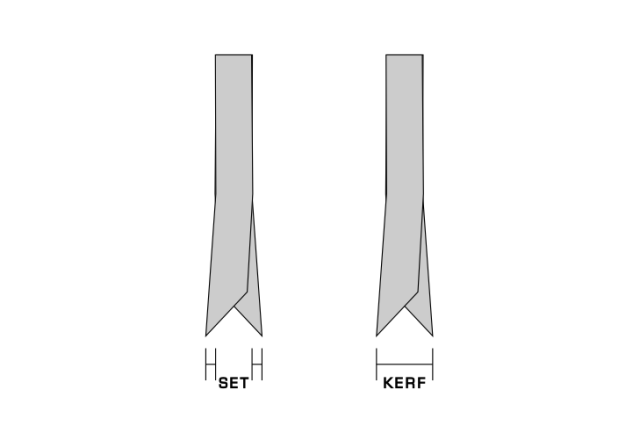
As you’ve most probably already worked out, Japanese saws (by having thinner blades) have less “set” and a smaller kerf than their equivalent Western counterparts. Therefore, they also tend to provide smoother finishes to cuts. Now, this might not sound like much of a difference to even bring up. But, if like me, you’re working with reclaimed wood and/or limited resources, then it might mean the difference between getting an extra tealight holder out of a length of fence post, or ending up with a scrap piece. Just something to consider.
Tooth Configuration/Pattern
Tooth configuration and/or pattern really depends upon the saw and its specific use, irrespective of whether it’s a Japanese or Western-type saw. But, I’ve chosen to include this section, just for completeness sake and (more importantly) to provide you with the most information possible.
The main factor when determining tooth configuration/pattern, is the material that you are intending to cut. So far, in this blog, the material being discussed has been dry wood. But, saws can be used to cut other materials, such as; green (wet) wood, plasterboard, metals and plastics.
Using a saw designed to cut a specific material, will determine the amount of “set” that saw blade has, as discussed in the last section. It will also determine the Hook (or Rake) angle that the teeth of the saw blade have. Now, I didn’t realise this was a variable factor, until I was researching my Circular Saw Blades: What You Should Know blog. The Hook/Rake of a tooth is how much it leans into (or away from) the material, as the cut is being made. So, the type of material the saw is being used to cut, is a determining factor for what that angle is.
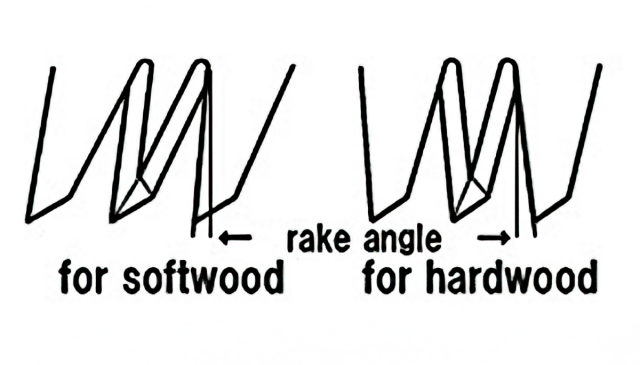
This angle (unsurprisingly measured in degrees) can be positive, negative, or even 0°. For blades used on softer wood species, green (wet) wood, the tooth angle is positive (leaning into), so that the teeth can efficiently dig into the material, which produces quicker, rougher cuts. For blades used on harder wood species, plastics and metals, tooth angle is negative (leaning away from), which produces slower, smoother cuts. Negative Hook/Rake also helps to alleviate quick wear-out of the blades’ teeth.
Induction Hardened (Hard Point) Teeth & Sharpening
This is a subject that will be detailed further in a future blog (link when available), but a lot of saw blades being produced today (for both Japanese and Western saws) feature induction hardened (sometimes referred to as “Impulse-hardened” or “hard point”) teeth.
This process increases the hardness of the teeth so that they retain a sharp edge for longer, but it also makes the steel more brittle. Which means DIY sharpening is not a practical option. The hardness of the teeth is typically made equal to (and sometimes greater than) that of a standard steel saw file. Plus, the brittle nature of the induction-hardened teeth means they’re more liable to chip or snap if sharpening is attempted.
Handles
Western Saws
If you nip down to B&Q (similar to Home Depot in the US), the majority of the handles on the saws you will see on display are most probably the D-type. This seems to be the “go to” handle type for contractor, DIY and tenon saws. Which usually incorporates some quick angle references for 90° and 45°, using the top of the blade as a straight edge for marking out. These handles are typically made out of some plastic, may be contoured, and may also have a rubberised grip to aid in comfort whilst holding and to reduce slippage.
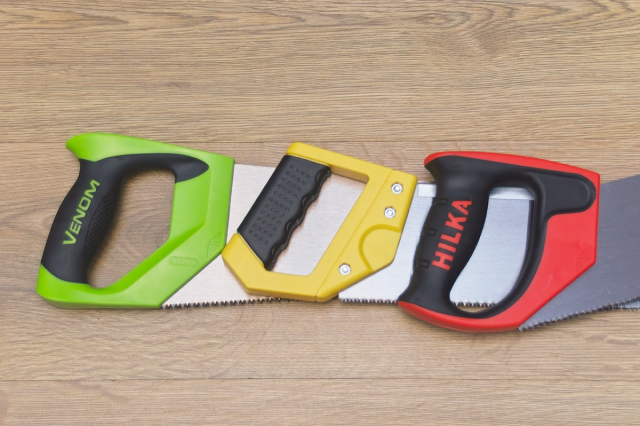
Whereas, traditionally made Western handsaws (such as those made by Thomas Flinn Co Limited, right here in my home town of Sheffield) have a more elaborate and elegant version of the D-handle. But, instead of plastic, they are made out of wood. Their tenon saws also have an “open handle” variety, which looks very much like a pistol grip.
Both of the D and pistol styles of handle are typically angled to the tooth line of the blade. This angle is called “The Hang Angle” (easy tiger), and has bearing on the type of cut that the saw produces. A high angle provides for a more aggressive cut, where a low angle provides for a less aggressive cut.
Japanese Saws
Traditional Japanese Saws tend to have a long, straight wooden handle, with more modern equivalents (aluminium and plastic) now being available. Some manufacturers of Japanese Saws also have pistol grip options available, but on the whole, they’re generally straight. Some of these handles also have a cord or Rattan wrap around them for decorative and/or grip purposes.
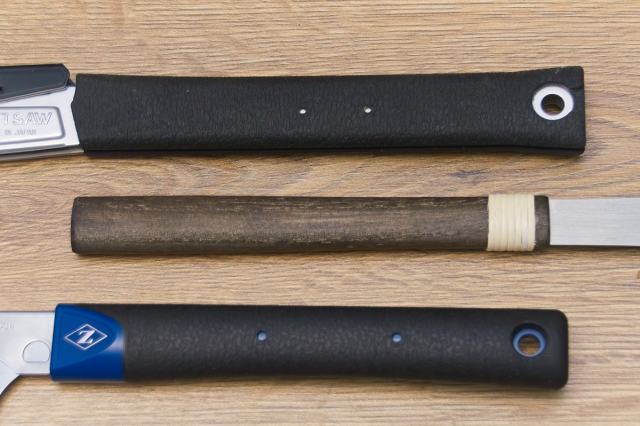
The straight handles, as mentioned earlier in this article, are again an evolution of Eastern cultures’ preference for sitting or squatting whilst woodworking. A two-handed technique is usually employed whilst cutting, with a strategic foot is placed on the piece to brace, if it isn’t held by other means.
Straight handles, along with the change in sawing technique required to use them, do take a bit of getting used to. Especially if you’ve only ever used Western saws in the past. Which, I think, is why some manufactures are now providing pistol grip options, to make the transition from Western to Japanese saws a little easier.
Speciality Saws
Whether of Japanese or Western origin, there are always some saws (which may be lesser used) that have their own quirks and foibles.
Ryoba-noko
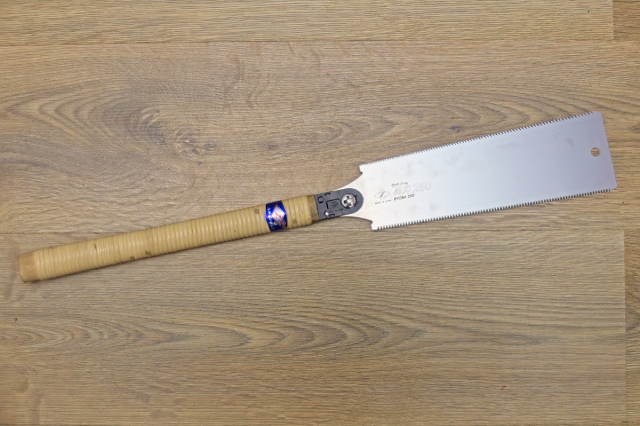
This is probably the most recognisable Japanese saw in the Western hemisphere, and one with no real Western equivalent. Its long, double-edged (the literal translation of “Ryoba”) blade has one edge specifically for making rip cuts (along the grain) and the other for cross cuts (across the grain). If Head & Shoulders® made saws, they would be exactly this! Take two saws onto the job site..?
Floorboard Saw
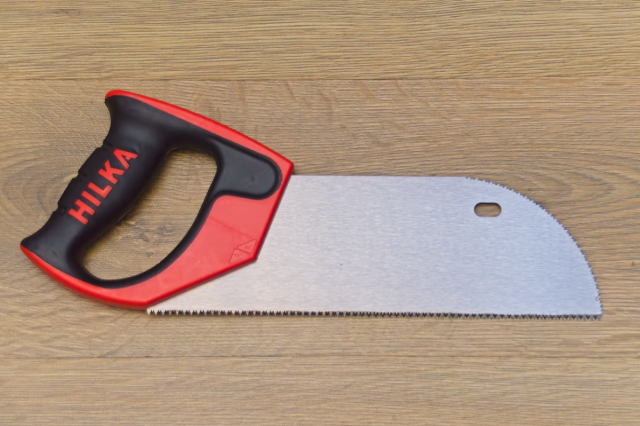
Western floorboard saws tend to have a round-nosed blade (or in some cases, the end of the blade rounds up), with teeth along it to be able to cut into the middle of floorboards without too much damage to adjacent boards.
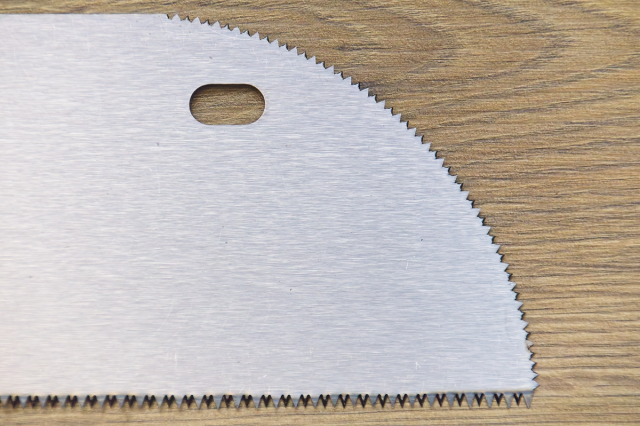
The nearest Japanese equivalent would be an Azebiki. Traditionally designed for making sliding dovetail joints and pocket cuts into sheet materials, this saw (like the Ryoba-noko above) also has a double-edge, but the blade is shorter. Again, one edge is for rip cuts and the other is for cross cuts, but the blade edges are convex (like the nose of a floorboard saw) to allow the pocket cuts to be made, in each direction.
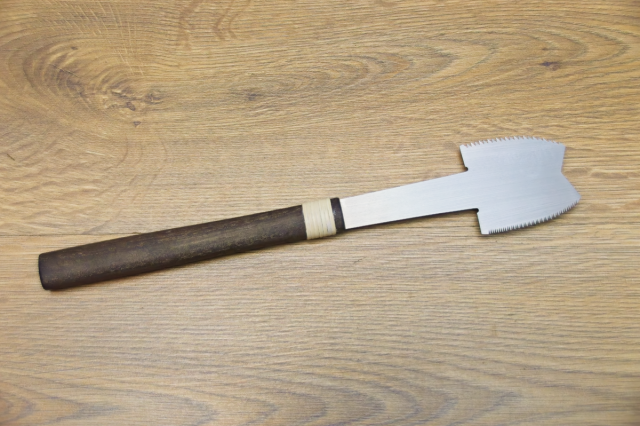
Flush Trim Saw
Kugihiki (which translates to “to cut nails”) are Japanese flush trim saws. They can be single-edged (Kataba) or double-edged (Ryoba), but they have no “set” to the teeth. This provides a smooth finish to cuts and greatly reduces the risk of scratching the surface of your workpiece.
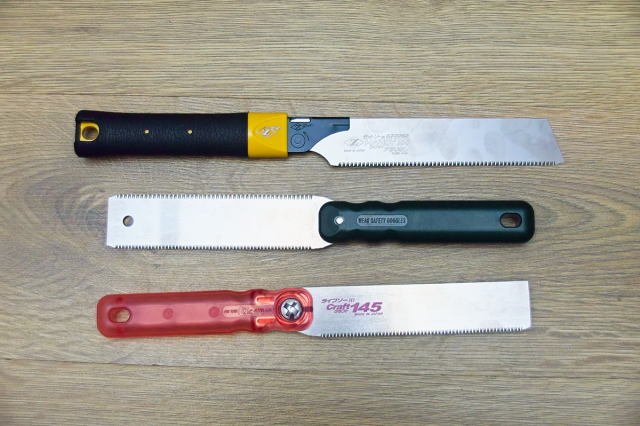
A number of Western Saw manufactures do have flush trim “pull” saws in their catalogue. Although, I know of at least one manufacturer that has a flush trim saw with a double-edge, yet they have made the bizarre decision to add “set” to one side of the blade. Which completely negates the ability to flip the saw over and use the other side of the blade, if needed.!? And another manufacturer markets one with a handle that allows for replaceable blades, but doesn’t physically sell replacement blades separately. Ah, the ploys (and joys) of corporate marketing.
Conclusion
When all is said and done, Japanese Saws vs Western Saws isn’t so much an “either/or” fight for dominance. Nor, are there any right or wrong answers when it comes to personal preference. It’s that preference that depends upon multiple factors and the intended use for which the handsaw is needed. But, now that you’re armed with the information required, you can go out and make the best choice for you, when selecting a saw.
Further Reading And Footnotes
If you want to find out more about Japanese Saws, then you can read my previous in-depth blog article on the different types, here. Or, if you want more information on the many Japanese saw blade types, then you can find that blog here.
You can view the ZETSAW range of Japanese Saws, Replacement Blades, Handles and Accessories, available to buy at Silverhand Store. Click any of the links above.
For more information about me and all that is Silverhand Creative, go check out the About Me page on this website. I have a presence on Instagram and Facebook, where I post photos (and the odd video) of ongoing and finished projects. There’s also a YouTube channel, where you can see how I go about doing what I do and what tools I prefer to use. So, feel free (there’s no pressure) to follow and/or subscribe to any (or all) of the above.
If you’re feeling fruity, and would like to support my endeavours, then please head over to the silverhandstore.com Shopify store and treat yourself a little something. I am most definitely amenable to commission work and have a web form for you to get in touch, should you be looking for something a little more bespoke.
All trademarks (registered or otherwise) used in this blog lie solely with their respective owners.